Some
approaches to Modding Moviestorm.
nb - March 08
By fair means or foul, there are a number of ways to alter the
out-of-the-box behaviour of Moviestorm (MS).
Even without the Modders Workshop -it *is* possible to add/alter items
- but it's more work than tweaking a slider!!
First the Fair:
The fabled MS Modders Workshop (MW) will readily allow changing some
simple attributes of the standard assets (colours, mapped images etc).
It will also allow import of new models and animations (not quite so
easy).
Unfortunately for most mere mortals, this is yet but a pipe-dream, as
the MW is
only available to a closed-test group..
27 Feb 08:
see forum here.
"
I'm afraid there still has not been a decision
as to when the modders workshop is going to receive the
attention it
needs before it is releasable."
Until the MW is released to the public, the following information may
help the more adventurous among you to get some alternative items into
MS by the back door. It is not detailed down to every
mouse-click needed - various experience required.
Shortfuze appear to be supportive of user mods outside of their
provided mechanisms.
Obviously
what you do in the privacy of your own home is your
business, but their cardinal rule seems to be -
"Don't
pass
off any of our
stuff as your own and try selling it to other people".
(This means the actual 3D
model files and 3D model derivatives thereof - not movies
generate with the models)
There have been positive messages from MS staff re simple mods like
re-coloured hair and clothes for which the files have been made freely
available to other users.
"Abandon
hope all ye who enter here,
into the murky underworld dark and
foul.."
(apologies to
Dante)
i.e.
- Acting upon any information
given here to alter MS is upon your own head.
If
you haven't backed up before you mod, do not expect sympathy if it all
turns to fertiliser
By knowing which files affect what aspects of MS, and learning the
correct incantations, you can alter reality (so-to-speak)
This does not claim to be an authoritative definition of how
Moviestorm (MS) works, or how to alter it.
It is merely a set of observations and experiments on a standard
installation of MS.
Other users will also have ways to mod MS.
There may be giant holes in my understanding. Your mileage/experience
may differ.
People should advise of errors they spot or illumination they
can throw on any topic - I will update these notes.
If any of the tips are too obscure to figure out, let me know.
Note that most of these activities are carried out OUTSIDE of
Moviestorm. You only fire up MS in order to see the results.
Topics :
Folders
- where stuff is
Altering
texture
files -
splash paint on almost anything
Importing
props - getting your
widget into MS
Altering
characters - costumes
Heads
Animations
The
movie.mscope file
Forum
Topics
Links
Folders
of Interest:
A "standard" install
of MS will create a folder "c:\program files\moviestorm"
Under that there is a bunch of sub-folders, but the two main ones of
interest here are "Addon" and "Data"
In the Addon folder, you will see a folder for each of the
modules that you have installed to MS - e.g. CoffeeShop01 or
MusicVideo01.
("Base" and "Core" are always there.)
Under each module folder, is another Data folder.
(at any point, there may be other folders, I will stick to
the ones of interest for this purpose)
The module Data folder generally contains one or more of Materials,
Props, and Puppets, Sky and Terrain_masks.
"Materials" can contain texture files (DDS and JPG's) for Walls,
Floors, Ceilings.
"Props" contains the data for static (mostly) models - anything not
people.
There
are category folders - e.g. Buildings,Food, or Weapons
etc etc.
There can then be more subcategory folders - e.g. Guns, then Rifles or
Pistols. (don't get too excited tho, in the Base module, many of these
are empty folders ! )
FINALLY - you arrive at a specific model folder : e.g.
Moviestorm\AddOn\Base01\Data\Props\Food\Crockery\Mug01
THIS is where the basic model data is. You will see .CMF,
.CRF, .CSF files - these are the files which make up the CAL3D model
format. It is rumoured that you can modify these files in for
example, Blender. Not for the faint-hearted.
.CMF files contain the geometry data for the model (vertices, faces,
yadda yadda...)
.CRFs are material descriptors - the ambient, diffuse etc values, as
well as the names of relevant texture files.
.CSF - skeleton descriptor. Even a coffee mug has a skeleton in the
MS/CAL3D world !
There are also .template files. These are an MS info file - they allow
MS to present variations of the same model when selecting props in MS,
with maybe just a different colour or texture.
Under the model folder is the Textures folder. Contains .DDS, .JPG,
.PNG files.
This is where you can carry out the
simplest Mods - to colours and texture content.
The main texture file is the "Diffuse" texture. Others represent
specularity etc (highlights and reflections etc)
There can be more than one Diff file, which will be selected
by one of the .template files in the model folder.
(showing the hierarchy to the example Mug model)
Program files
Moviestorm
AddOn
Base01
Data
Materials
Props
Food
Condiments
Crockery
Mug01
Textures
The "Puppets" folder: These are (currently) the Humans.
Can have a Female and a Male subfolder, each of which can have:
Accessories
Animations
Costumes
Hair
Hats
Heads (<<==only seems to be
in "Core" )
In the same manner as for props, these folder structures lead
down to a specific item folder, which contains the .CMF etc
model files, and the Textures sub-folder.
e.g.
AddOn\Base01\Data\Puppets\Male01\Hats\Baseball_Cap
Animations contains category folders, (like Gestures, or Fighting) and
these contain the CAL3D .CAF animation files.
Construction data for the movies you create is typically
stored in
"c:\documents and
settings\<yourLogin>\moviestorm\movies\<movieName>"
The file currently of interest is "movie.mscope". It is an
XML file that contains the initial settings for everything in a scene.
Various unusual effects or just fine tuning can be achieved by tweaking
it.
Make
a backup of your complete program files\Moviestorm folder tree, or at
least the folder you are working in.
Altering
texture files
The simplest mod is to edit texture
files.
The same principle applies whether your
wish to put your name on a coffee mug, a shirt, or tattoo it on a
character's forehead,
(or just change a
colour, or change an entire texture image)
Locate the relevant texture
files. This may involve much searching through the folders to match the
folders and filenames with the item you want to change.(set View -
Detail)
It can help to scan through the .Addon
files found in each module top folder (e.g. AddOn\Base01\.Addon )
This can be viewed in Notepad - just
make sure you do not "save" again, as there is a bunch of binary data
at the start which would be screwed. (this is another reason
to backup any folder before you touch anything in it!!! )
Once you believe you have found the
relevant texture files ( you can view thumbnails in Explorer, to check
they look right),
you then need to be able to edit them.
Most of the MS textures are in DDS format.
The free Paint.net can supposedly edit
them directly. I believe Photoshop can also.
Otherwise, use an image
converter, like nconvert (see links) to change the DDS to a JPG.
Edit the JPG, save, reconvert back to
DDS.
(you may have to experiment to
see which of the files in the texture folder you have chosen need
editing.)
For a quick and uncomplicated example :
AddOn\Base01\Data\Props\Food\Crockery\Mug01\Textures\Mug01_Diff.dds
And if you do want to tattoo a forehead
AddOn\Core\Data\Puppets\Male01\Heads\Euro\Textures\business01_Head_Diff.dds
(up to you to figure which head texture
belongs to which character - if someone would like to do so and provide
a list - I'll add it here :o)
In the "Materials" folder mentioned above - similar changes
can be made to the textures for Walls,
Floors, Ceilings.
There are a number of forum
threads on texture modding.
(several much older ones are in a restricted area)
Importing
props
Note that the methods
described here require the selection of "sacrificial lambs" from the
standard MS props.
To fully add a new prop to MS would
require modifying various informational data files used by MS to
identify and locate the model files and map them into menus and
selection lists. This will be what the Modders Workshop handles. It
also gives SF their licensing mechanism - and I for one certainly want
them to succeed in their business model and keep developing MS for a
long time yet !
So I'm not going to get into that.
SO - what we can do relatively simply - is to pick an existing prop,
and just modify or replace its model files.
Want something gruntier than the ol' family car?
I replaced the mesh file in :
AddOn\Base01\Data\Props\Vehicles\Cars\Car_Family_Saloon_01
with a model converted to the CAL3D format:
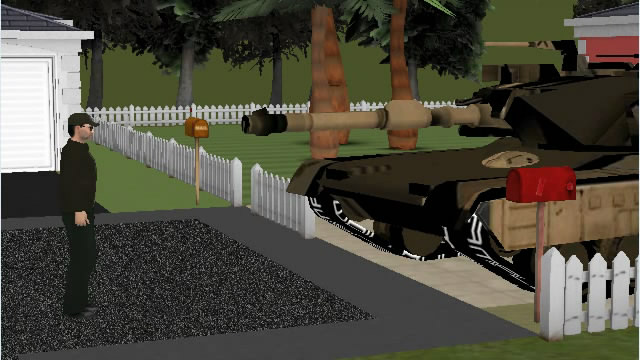
At the other end of the scale - you could replace the coffee mug with a
designer alarm clock.... (I don't think there is any size
restriction - so you could have replaced the mug with the tank
! However - as previously stated - no guarantees that this
will work for any given combination...)
Now - the first consideration is that, whatever you replace, obviously
it cannot be required in the same scene as its replacement. But there
are so many props, you shouldn't have trouble finding unused ones. You
can of course copy the original files back into place in order to use
that model as it was.
I recommend that you *do* restore the various files once you are done
with a project - so that you can start MS with its "expected" setup
next time.
When replacing an MS model - you must have the equivalent CAL3D model
files. A mesh .CMF, material files .CRF, and texture files.
It most avoids complications to use the same filenames.
i.e. to replace the first coffee mug model, your new model mesh would
be called "Mug01.CMF", the material file "Mug01 [0].crf", and
the texture " Mug01_Diff.dds"
For a more complex model, e.g. multiple materials, try to find an
existing prop
that has a matching setup. You could try altering the prop's .template
file, which is the simplest of the model mapping files.
How to get the CAL3D files.
I am aware of two 3D editors that can export CAL3D format
model files - 3D Studio (horribly expensive), and Blender (ummm, a
"non-intuitive" piece of software)
So I wrote a converter to allow the use of pretty much any editor (like
the free Anim8or).
Once I have got more of this page done - I will make the
"nbconv"
model converter available.
It has been trialled with the MS Pioneers group.
It takes .3DS files, .OBJ files, or Collada .DAE files as exportable
from Sketchup, and converts to the CAL3D files required for MS.
Importing
Characters
Characters are built from 4 major "building blocks".
1 - The skeleton,
2 - The body - from shoes to neck,
3 - The head,
4 - Special props.
In the "special props" category I include things like hair, glasses,
cellphones, guns - anything that must be tied accurately to body
position/movement.
The head and body are fully rigged for animation via the 101
bone skeleton.
There is one female and one male skeleton - common to all
characters. The size thereof limits us to adults at this time.
Animations are specific to a skeleton - due to fixed initial XYZ
positioning of
the joints within the animation data - I've tried shrinking a skeleton
and body mesh - when a stock animation kicks in, it doesn't look good !
To be blunt - unless SF made sample 3DS model sources available, it
would be a significant struggle for a user to build a new MS
character model.
And even then - there won't be too many "normal" MS users who have
legal copies of 3D Studio.
The trouble with trying to build a body, is that the thousands of
vertices must be allocated and weighted to the exact right ones of
those 101 bones in the standard skeleton. Otherwise the
animations will again make it look like something that has spent too
much time in a nuclear tanning booth..
It could be done, but you'd need a lot of time..
I think the only way to enable the average user to get their own
envisaged characters will be for one of us folk (who like to play with
this stuff ) to build a "stock character modifier". (personal use only,
as per Rule Number One).
I don't think it would endanger SF's revenues, as it will
always be a lot better result to buy their "proper" models, especially
of the sort of quality they have been producing recently. But of course
they will never cover everyone's requirements, at the time they are
needed.
Altering costumes
Note that "Costumes" are actually full human models - everything
except the head.
The system currently does not have for example separate jackets, or
trousers, or shoes.
To change the shoes - swap in an entire body model which has different
shoes.
As per the comments above - there is not much apart from the textures
that one can change in the costumes.
(unless of course, Blender can *read* the CMF model files. In
which case you could make alterations to the model mesh, and then drop
it back into place in MS. Even if it does, I cannot see a stampede in
Blender's direction happening.)
Heads
Over 1/3 of the entire skeleton's 101 bones are dedicated to
the head - jaw, cheeks, lips, eyes, even one for the nose, so
I guess they could do a "Bewitched" nose-wiggle! (but not the ears :(
This explains why MS beats the pants off much of the competition in the
facial expressions department.
Same comments apply as per the Costumes above as far as altering the head models.
You can certainly drop replacement model files into place, but they would have
to conform to the MS skeleton bone weightings, and not physically clash
with the standard head accessories (if you wanted to combine them).
If one *was* able to edit a head CMF model in say Blender, -
I imagine that assorted beard options might be easier achieved by
editing them into the head model, rather than trying to make a new separate beard model
that stayed in synch with the face during various animations.
An individual would have this choice, whereas SF presumably need to
make the beards general purpose, applicable to any head.
Another somewhat simpler approach to head-mods would be to edit the texture files.
They are found here-abouts:
AddOn\Core\Data\Puppets\Male01\Heads\Euro\Textures\business01_Head_Diff.dds
(up to you to figure which head texture belongs to which character)
These are of course in UV mapping format, so look a bit weird - the wrap-around skin laid out flat.
You can't change gross physical appearance - higher cheek-bones etc - but it would be interesting to
see what variety people manage to come up with via shading etc.
Animations
There are similar constraints on the practicality of normal
users
creating new animations as those for modifying the head and costumes.
If one does manage to output an animation file from a 3D
editor, based on the standard MS skeleton, then the same mechanism of
replacing an existing MS animation file with your new one will work
just like replacing a texture file.
It is possible to "massage" an existing MS
animation data file, but it is a slightly daunting task.
In a simple animation, "Disapproving roll eyes", which lasts
for 1.8 seconds, there are approx 45,000 floating point numbers held in
the CAL3D animation .CAF file.
Once you study the CAL3d file formats, and work out which
numbers do what, you can tweak an animation by altering the file
directly - but I must admit, it takes dedication and a quiet dark room.
Movie.mscope
When you create a movie project, the information describing what you
added and where it was placed is stored into a file movie.mscope, in "c:\documents and
settings\<yourLogin>\moviestorm\movies\<movieName>"
It is possible to "fine tune" the positioning of Actor Marks and
Camera positions by editing values in the mscope file.
It is also possible to get some unusual effects - such as placing
actors and props up high.
Some other uses of Hacking the Mscope file are discussed here.
It is an XML file, and can be edited with for example Notepad. (any
plain-text editor - or an XML-specific editor, e.g IXedit)
The relevant tags are <transform> for
Actor Mark positions,
and <keytransform> for Camera positions.
To see the effect of raising a character up into the air:
I suggest you create a trivial scene for first experimentation - one
character, 2 marks (UNrotated), nothing else.
Save a backup copy of the mscope file.
Open the movie.mscope file in a plain-text editor like Notepad
(unless you have a fancy-smancy XML editor)
Find the
<marks>
<mark> (there will be one <mark> section per mark
...
<transform>
Alter an UP-value (see below),
save the mscope file. restart MS, check for a floating feeling  .
.
In the transform data,
Prop and Mark positions are controlled by <transform>.
The Transform data is in the format :
1 0 0 BACK 0 1 0 RIGHT 0 0 1 UP 0 0 0 1(?Alpha??)
the 1's & 0's are for default rotation of the prop/mark- they all
change with rotation!!
The Back/Right/Up units are 1 unit per gridSquare in the set editor
(human male about 1.75 gridSqrs tall - so 100 CAL3D/model units per
grid sq - i.e. grid is 1 METRE units)
e.g.
<transform>1.0 0.0 0.0 -5.8956914 0.0 1.0 0.0 4.964206 0.0
0.0 1.0 8.940697E-8 0.0 0.0 0.0 1.0</transform>
in this case, the 8.940697E-8 value is UP. ( Note the typical normal UP
is a very small +ve value .)
Forum
Topics
Green
screen replacing a sky texture with pure green to allow
chroma-keyed compositing.
Retextured
Goatee
Custom
wallpapers
Hacking
the Mscope file
Links
Free utilities
nconvert
DDS image converter
Paint.Net
image editor
IXedit XML editor